
If you are building a small solar system, one of the first things you need to understand is how to connect the solar panel, charge controller and battery correctly.
The basic arrangement is:
Solar Panel → Charge Controller → Battery
The charge controller sits between the solar panels and battery. Its job is to control the charging process and help protect the battery.
But there is an important point many beginners don’t know:
You should not connect the panels to the controller without first checking the controller and battery specifications.
You also need to pay attention to positive and negative connections, panel voltage, battery voltage and the correct wiring order.
In this guide, we will explain the process in simple terms.
If you are not sure what size charge controller you need, use our Solar Charge Controller Calculator first.
What You Need
For a basic solar charging system, you may need:
- Solar panel or solar panels
- Solar charge controller
- Battery
- Solar cables
- Battery cables
- MC4 connectors where applicable
- Appropriate fuse or circuit breaker
- Mounting and connection accessories
For larger systems, additional protection equipment may be required.
The Basic Solar Connection
The basic setup looks like this:
Solar Panels
↓
Charge Controller
↓
Battery
The inverter is normally connected to the battery bank rather than directly to the charge controller.
A simple system therefore looks like:
Solar Panels → Charge Controller → Battery → Inverter → AC Appliances
Step 1: Check Your Equipment Before Connecting Anything
Before connecting the system, check the specifications of all the components.
Solar panel
Check:
- Wattage
- Voc
- Vmp
- Isc
- Imp
Charge controller
Check:
- Maximum PV voltage
- Maximum charging current
- Maximum PV power
- Battery voltage
- Battery type compatibility
Battery
Check:
- Battery voltage
- Battery capacity
- Battery type
- Recommended charging voltage
- Maximum charging current
This is important because two solar panels with the same wattage can have different voltage and current characteristics.
Step 2: Confirm the Battery Voltage
First identify whether your system is:
12V
24V
or
48V
The charge controller must support the battery voltage.
For example, a controller designed only for a 12V/24V system should not be connected to a 48V battery bank.
Battery voltage also affects how much solar power a controller can handle.
For example, 1,000W of solar requires much more charging current on a 12V system than on a 48V system.
This is one reason larger solar systems often use higher battery voltages.
Step 3: Connect the Battery to the Charge Controller First
For many conventional charge controllers, the recommended connection order is:
Battery first → Solar panels second.
This allows the controller to detect the battery voltage and initialize correctly. Multiple controller manuals and installation guides recommend this sequence.
Connect:
Battery positive (+) → Controller battery positive (+)
Battery negative (-) → Controller battery negative (-)
Make sure the polarity is correct.
Once connected, the controller should normally turn on or show the battery voltage, depending on the model.
Always follow the specific installation instructions supplied with your controller if they differ.
Step 4: Connect the Solar Panels
After the battery is connected, connect the solar panels to the controller’s PV terminals.
The terminals may be marked:
PV+ and PV-
or something similar.
Connect:
Solar panel positive (+) → Controller PV positive (+)
Solar panel negative (-) → Controller PV negative (-)
Check the polarity carefully before making the connection.
Step 5: Check the Solar Panel Voltage
This is one of the most important parts of the installation.
The solar array voltage must remain within the controller’s permitted PV voltage range.
For example, if your controller has a maximum PV input of 100V, you cannot simply connect panels in series until the array reaches 120V.
Remember that Voc is particularly important when checking the maximum voltage of a solar string.
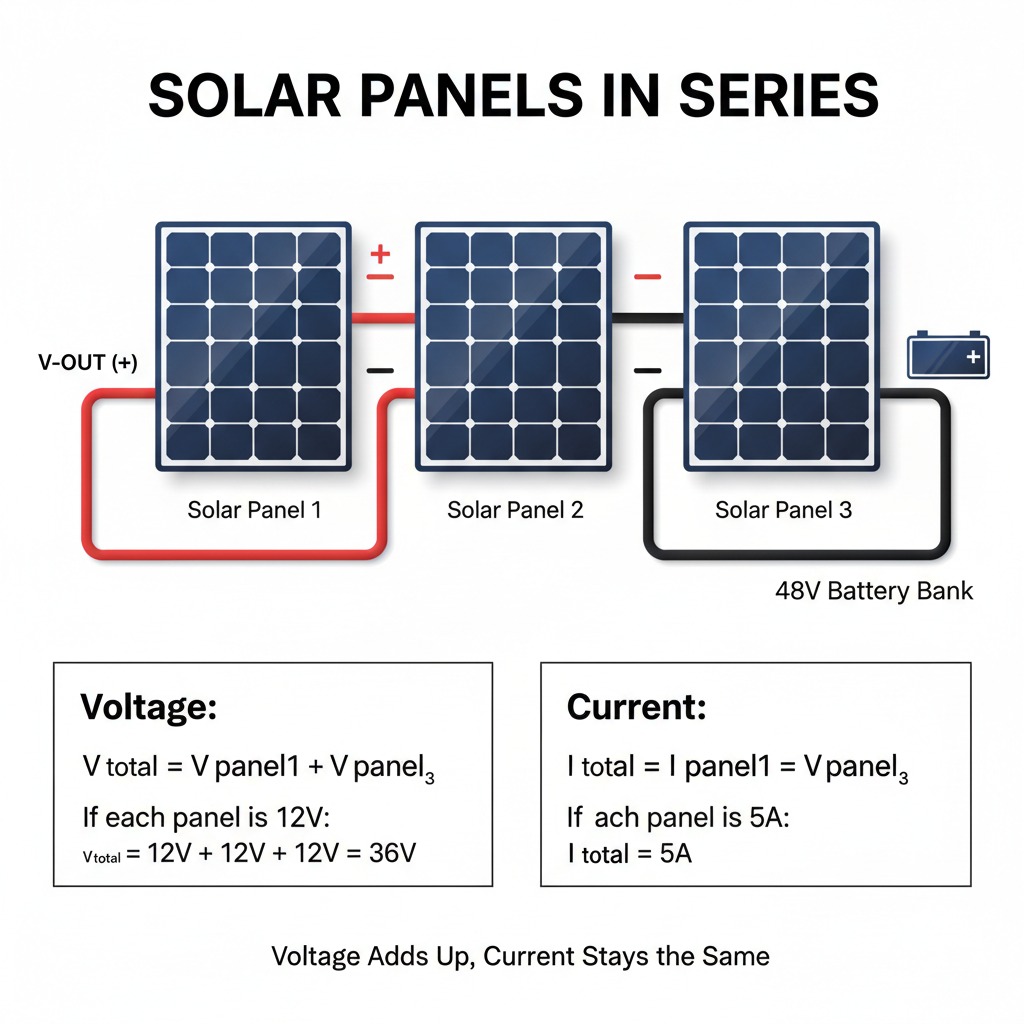
What Happens When Solar Panels Are Connected in Series?
When panels are connected in series:
Voltage increases.
For example, suppose one panel has:
Vmp = 40V
Two panels in series would have approximately:
80V Vmp
Three panels:
120V Vmp
But you must also check Voc.
If one panel has:
Voc = 48V
then three panels could have approximately:
144V Voc
That could exceed the maximum PV voltage of some controllers.
Therefore, never choose the series arrangement based only on panel wattage.
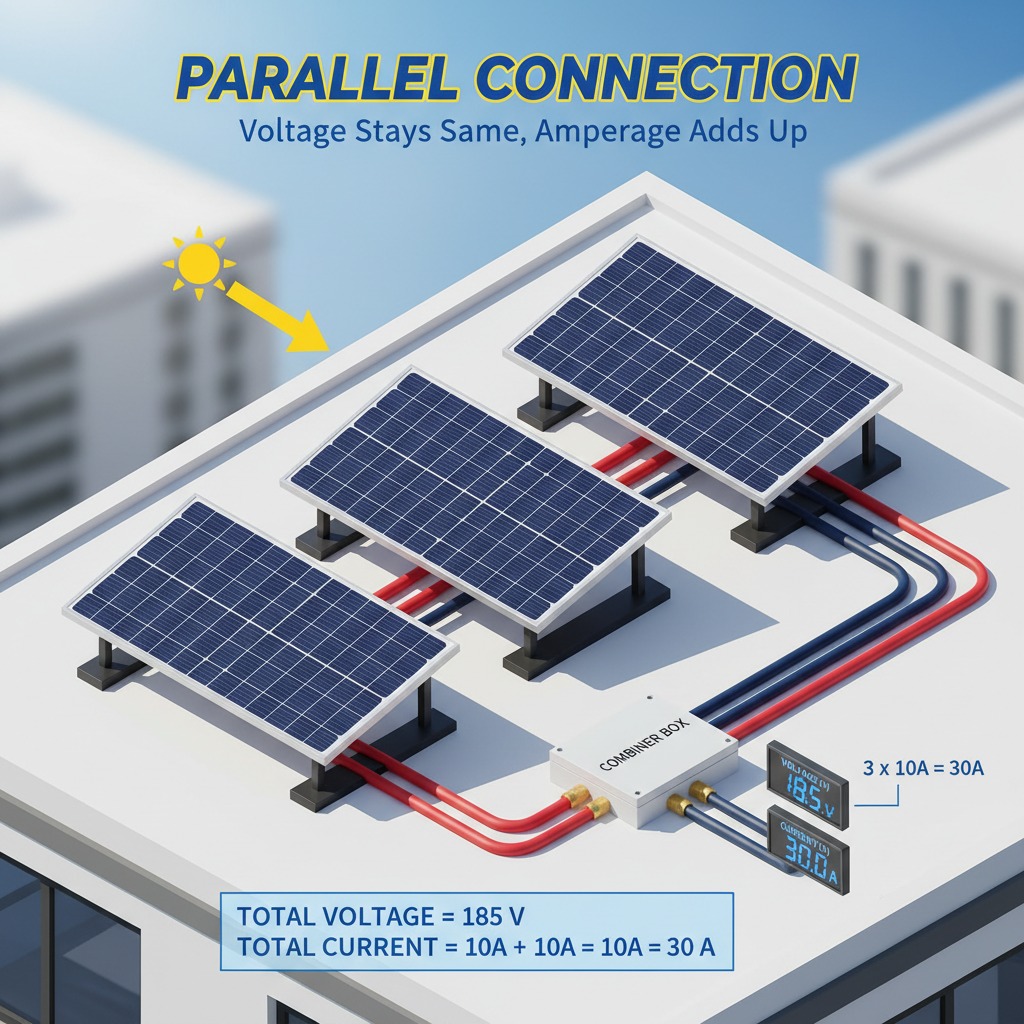
What Happens When Solar Panels Are Connected in Parallel?
When panels are connected in parallel:
Current increases while voltage remains approximately the same.
For example, if one panel produces:
10A
two similar panels in parallel may produce approximately:
20A
This means the wiring and controller must be able to handle the higher current.
Series or Parallel: Which Is Better?
Neither is automatically better.
It depends on your:
- Panel specifications
- Battery voltage
- Charge controller
- Cable distance
- Controller PV voltage range
- Required system voltage
MPPT controllers are generally more flexible for higher-voltage solar arrays and series-connected panels.
PWM controllers usually require closer matching between the solar panel voltage and battery charging voltage.
For a detailed comparison, see our guide:
PWM vs MPPT Charge Controller: Which Is Better for Solar in Nigeria?
Step 6: Set the Correct Battery Type
Many modern charge controllers allow you to select the battery type.
Depending on the model, you may see:
- Flooded
- AGM
- GEL
- Sealed lead-acid
- Lithium
- User-defined
Choose the setting that matches your battery.
This is particularly important when using lithium batteries because their charging requirements can differ from lead-acid, tubular and GEL batteries.
Always check the battery manufacturer’s recommended charging settings.
Step 7: Check the Controller Display
After the connections are complete, check the controller.
Depending on the model, it may show:
- Battery voltage
- Solar voltage
- Charging current
- Solar power
- Battery charging stage
- Battery percentage
- Error codes
If the controller shows solar power coming in, the panels are being detected.
If it shows charging current going to the battery, the battery is being charged.
What Does the Charge Controller Display Mean?
Different brands use different displays, but you may see something similar to:
PV
This represents the solar panel input.
Battery
This represents the battery connection and status.
Load
Some controllers have a separate DC load output.
A
This usually represents current in amperes.
V
This represents voltage.
W
This represents power.
Charging symbols
These may indicate that the battery is currently being charged.
Always check the manual for the exact meaning on your controller.
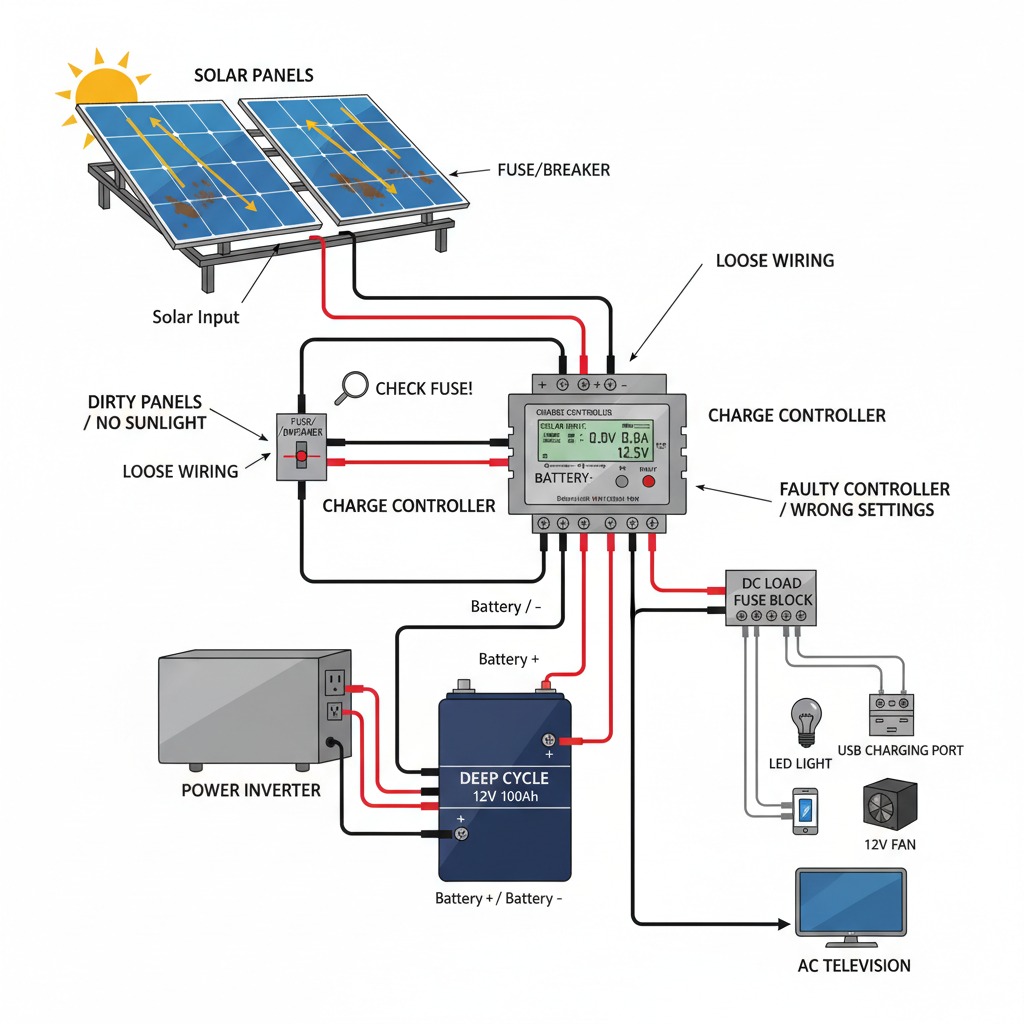
Why Is My Charge Controller Not Showing Solar Input?
If the battery is connected but the controller is not showing solar power, check:
- Is there sunlight?
- Are the panels connected?
- Are the PV cables properly connected?
- Is the polarity correct?
- Is the panel voltage high enough?
- Is there a blown fuse?
- Is the panel shaded?
- Is the controller showing an error?
Do not immediately assume the solar panel is bad.
Why Is My Battery Not Charging?
If the controller detects the panels but the battery isn’t charging properly, check:
- Battery voltage
- Battery connection
- Battery type setting
- Battery BMS if using lithium
- Solar power available
- Controller settings
- Controller size
- Fuses and breakers
- Current being used by appliances
We have a separate guide covering this problem:
Solar Charge Controller Not Charging Battery? Causes and What to Check
Can I Connect the Solar Panel Directly to the Battery?
For a normal battery-based solar system, do not connect the solar panel directly to the battery without the appropriate charging control system.
The charge controller regulates the charging process.
Connecting a panel directly to a battery can result in improper charging and may damage the battery or create a safety problem, depending on the panel and battery.
The correct setup is generally:
Solar Panel → Charge Controller → Battery
Can I Connect an Inverter Directly to the Charge Controller?
For a typical battery-based system, the inverter is normally connected to the battery bank, not the charge controller’s small DC load output.
The basic arrangement is:
Solar Panel
↓
Charge Controller
↓
Battery
↓
Inverter
↓
AC Appliances
This allows the battery to store energy and supply the inverter.
Can I Connect Multiple Solar Panels to One Charge Controller?
Yes, provided the complete solar array remains within the controller’s specifications.
You need to calculate:
- Total panel wattage
- Total series voltage
- Total parallel current
- Maximum PV voltage
- Maximum PV power
- Maximum charging current
For example:
4 × 250W panels = 1,000W
That does not automatically mean every 60A controller can handle them.
The battery voltage and controller specifications also matter.
Use our:
Solar Charge Controller Calculator
to estimate the controller size you need.
How Many Solar Panels Can a Charge Controller Handle?
It depends on the controller and panels.
For example:
4 × 250W
1,000W
6 × 250W
1,500W
8 × 250W
2,000W
But you still need to check the controller’s:
Maximum PV power + maximum PV voltage + maximum charging current.
We explain this in more detail in:
How Many Solar Panels Can a Charge Controller Handle?
What Size Charge Controller Do I Need?
The answer depends on your:
- Solar panel wattage
- Battery voltage
- Panel voltage
- Panel current
- Controller type
As a simple starting calculation for an MPPT system:
Controller current ≈ Solar panel watts ÷ Battery voltage
A planning margin is then normally added, and you move to an appropriate controller size.
For example:
1,000W ÷ 24V = 41.7A
With a 25% planning margin:
41.7 × 1.25 = 52.1A
You would then look at a controller around 60A, provided its other specifications support the solar array.
For the full calculation, use our:
Solar Charge Controller Calculator
What About a Hybrid Inverter?
If you are using a modern hybrid solar inverter, you may not need a separate charge controller.
Many hybrid inverters already have a built-in MPPT solar charge controller.
In that case, the solar panels connect directly to the inverter’s PV input according to the inverter manufacturer’s specifications.
The inverter then manages the solar charging and battery system.
This is why you should first check whether your inverter already has an MPPT before buying a separate controller.
Important Safety Advice
Solar panels can produce dangerous DC voltage whenever they receive sunlight.
Before working on a solar installation:
- Turn off the appropriate isolators.
- Follow the equipment manufacturer’s instructions.
- Use correctly rated cables and protection devices.
- Check polarity before connecting.
- Do not exceed the controller’s maximum PV voltage.
- Do not work on unfamiliar high-voltage systems yourself.
For larger systems, have a qualified solar installer or electrician handle the installation.
The exact connection and isolation procedure can vary between equipment, so the manufacturer’s manual should always take priority.
Check Solar Equipment Prices in Nigeria
Once you know what equipment you need, you can check our:
The page includes estimated Nigerian market prices for:
- Solar panels
- Inverters
- Lithium batteries
- Tubular batteries
- GEL batteries
- Charge controllers
- Solar accessories
- Other solar equipment
Prices can change because of exchange rates, brand, seller, location and stock, so the figures should be treated as market estimates rather than fixed prices.
Use Our Solar Calculators
You don’t have to guess the size of your equipment.
Start with the:
Solar Charge Controller Calculator
You can also use:
Solar Panel Calculator — estimate the solar panels needed.
Battery Calculator — estimate your battery requirements.
Inverter Calculator — estimate the inverter size.
Solar Installation Cost Calculator — estimate the likely installation cost.
These tools can help you move from simply asking “How much does solar cost?” to understanding what equipment your particular system actually needs.
Final Advice
Connecting a solar panel to a charge controller is not difficult to understand, but the electrical specifications must be correct.
The basic arrangement is:
Solar Panels → Charge Controller → Battery → Inverter
Before connecting anything, confirm:
- Battery voltage
- Solar panel voltage
- Solar panel current
- Controller maximum PV voltage
- Controller maximum PV power
- Controller charging current
- Correct polarity
- Correct battery settings
For many conventional controllers, the battery is connected before the solar panels, but always follow your controller’s own manual if it specifies a different procedure.
If you are unsure about the controller size, don’t guess.
Use our Solar Charge Controller Calculator
Then check the estimated cost of the equipment on: